Sunday 31 October 2021

Vikings

More stuff shuffling off the painting table. Couple of plastic Vikings from Gripping Beast. Not the best models IMO, but they'll be handy for games of OGAM or Midgard.


Leader bloke needs a shield at some point I guess...

Saturday 30 October 2021

Grotfang - an Orctober Warboss

 So I started this guy just the seven (!) years ago.

I didn't do a very good job of the greenstuffing all those years ago, which put me off doing anything with him for quite a while. But then he found his way on to the painting table and I did bits and pieces over a few years.

I decided that this Orctober I'd get him finished. And I (almost) have.


Even on the upgraded big-pig he still looks ridiculously big to be riding such a thing. I'm still not happy with my green stuff skills, but with paint on it doesn't look so terrible.

He just needs a shield and basing - so look forward to seeing him again in Orctober 2028

Friday 29 October 2021

Orc Boys for Orctober

Because it's Orctober I've polished off a few Orc Boys that had been lurking around the painting desk for a while.

This finishes off the 24 that'll form this unit.


This one is actually one of the models from the 6th edition starter set converted to lose one hand weapon and add a different right arm - I ran out of multipart boys and they're next to impossible to get hold of, whereas I have a bunch of these.


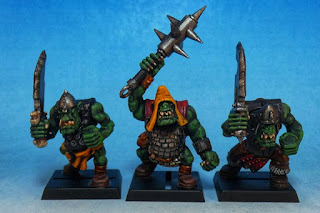
They need basing and shields. I'm currently experimenting with casting some shields using blue stuff as I haven't got enough of the oval GW ones to do the whole unit.

Thursday 28 October 2021

Chain of Command - Fighting Withdrawal Campaign Game Two

And so to game two.

A version of the Probe scenario with the Germans trying to get off the table edge and the British trying to stop them. The British start with six support, the Germans have twelve. 

I have only three platoons to use during the campaign and one was badly mauled in the first game. Whereas the Germans get a brand new fresh platoon for each game.

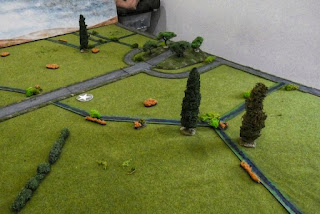
There's a big old straight road down the middle of the table and I agonised for ages about the correct support choice. One obvious way for the Germans to win is to just speed a vehicle straight down the road and off. So I was tempted to take the 2pdr - but eventually i decided that was only going to stop Martin winning one way. If I actually wanted to win I needed to kill Germans and drive down morale so I decided on a Vickers - ideally to occupy the bunker.


Having set up the terrain as closely as we could to match the map we played out the patrol phase.
I did this very badly - my brain can't calculate the various angles - so I ended up with quite a few JoPs with only limited space to be placed.
I then foolishly placed the resulting JoPs. One right on my extreme left flank, one behind the bunker (because I was obsessed with getting the Vickers in there) and one between the house and outbuilding.
This left rather a big gap on my right flank where there was no wire. And cheerfully ignored the fact that Martin had placed a JoP quite far forward on that flank.

Inevitably the Germans deployed a squad from that flank and, taking advantage of a double phase, ran them toward the tank ditch.


Frantically I struggled to respond. A squad deployed in the house and opened fire, but despite the Germans being in the open the only result was some shock.

The Germans raced forward - having set off on this charge they were now fully committed.


Soon they were across the ditch.


And the German FOO had called in a ranging shot.


Along with bringing on an Infantry gun who took out the Junior Leader with the squad in the house. Fortunately no effect on my morale.


I managed to squeeze a squad on just outside the mortar field.


And their Bren opened up on the racing Germans - but despite some casualties and mounting shock they kept going.


The Infantry Gun prepared to unleash more rounds...


....however with another double phase and a nice high running roll the German infantry squad raced from the board and the game was up!

Well that was over fast.
To be honest I lost the game in the Patrol Phase and set up. Poorly positioned JoPs and paying no attention to what Martin was doing meant I left my right flank wide open and Martin took full advantage.

The only good news for me was that I only took a couple of casualties - so this platoon will remain at full strength for future games.

The game was over very quickly - probably took us longer to set up than play - but with a campaign that doesn't matter- it just adds to the narrative.

So now we move on to the next game - another Probe for the Germans - but British defences are a little more formidable. I need to think hard about the Patrol Phase and placing JoPs - another easy win for the Germans like this and it'll be next to impossible to win the campaign.

Sunday 17 October 2021

Chain of Command - Fighting Withdrawal Campaign Game One

Way, way, waaaaaay back in the mists of time before the plague, Martin and I decided we'd like to play some Early War Chain of Command. We bought armies and even settled on a campaign - Fighting Withdrawal from the 2016 Summer Special. 

Then the world changed. We managed a couple of warm up/practice games between lockdowns but the plan to play the campaign remained bubbling in the background. We collected the terrain, consulted Google for images and made some buildings and other bits and pieces.

Finally however the stars aligned, diaries were free, jabs were administered and the first game could take place!

The first scenario sees a British force counter attacking as the Germans cross a partially demolished bridge. A British win shortens the campaign - giving the Germans less time to push on to Dunkirk.

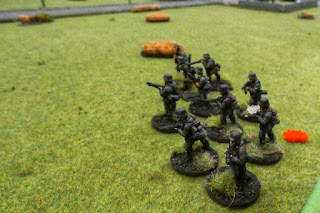
The British have an Early War platoon (slightly different to the one in the Blitzkreig supplement as the campaign predates that) and just an adjutant as support. The Germans also have a single platoon and no support. Their are some restrictions on the German deployment that aren't entirely clear from the campaign - but after a little discussion and some feedback from the web we settled on.

  • Play the Patrol Phase as normal for Attack and Defend with British as attackers
  • The Germans have two squads and a Senior Leader *available* to deploy but subject to the usual rules and the effects of a preliminary barrage (so deploy on a 4+)
  • The end of a turn ends the bombardment and allows the deployment of another squad (and the option of deploying the mortar or the other senior leader) subject to the usual deployment rules
  • Another turn ends makes the final squad available (plus whichever of mortar/SL wasn't deployed in the previous turn - in reality the absence of an adjutant makes this likely to be the second SL)
Clearly it's possible to interpret the rules in other ways but this seemed to make most sense to us. Limiting the German forces across the canal and encouraging the British to attack.

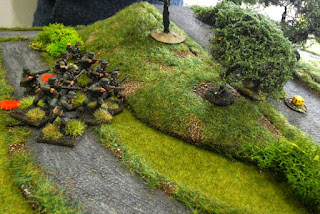
The field of battle. The hill with road represents the end of a bridge over the canal that the British have partially destroyed - the Germans are feeding infantry over the wreckage in an attempt to establish a bridgehead. The Second Battalion of the Bedfordshire and Hertfordshire regiment are tasked with throwing them back.


The drainage ditches provide light cover but are no obstacle to cross.


Knowing my best bet was to strike before the turn ended and more Germans arrived I deployed aggressively


All three squads were soon up to their waists in ditches.


Martin had managed to get one Jump Off Point out on his right flank and likewise deployed a squad into the ditches.

My plan was to hold up the left with smoke and a single squad while concentrating the fire of my two other squads on a single German squad by the bridge. Ideally I'd race across the open ground and capture the JOP.


I deployed some smoke to cover an advance on my right, but left the MG team exposed to be sniped at by two Brens.


More smoke tried to cover my left.


But the Germans soon started adding shock on that flank.

 
But this left my centre squad free to target the Germans by the bridge.


Though they started to take casualties in return.


The pressure on my left was mounting so I deployed more smoke, completely screening that flank. This would allow the Germans some respite (and possibly to advance) but it seemed sensible.


Unfortunately at around this point Martin threw three sixes and the turn ended and all the smoke went away! This was worrying and I considered withdrawing at this point - the Germans were still at full strength and my numerical advantage had just disappeared.

However I decided to stick around and see what unfolded. Fortunately some good shooting finally pinned the Germans by the bridge. Martin didn't bring another squad on to reinforce them so I decided to seize the day. Emboldened by a double phase the British squad on the right broke cover and sprinted toward the pinned Germans on the end of the bridge.


Disastrously the second roll was all 4s, 5s and 6s!
The squad was left in the open mere feet from the German guns!


Martin's third squad pushed up on the German right of the bridge.


Fortunately the German shooting, hampered by pinning did little and I was able to press home the charge!
It was touch and go and not nearly as one sided as I'd hoped but the British wiped out the remains of the German squad and their Junior Leader fled toward the bridge.


Soon after this I had the opportunity to end the turn. A double edged sword as it would mean the last German squad would become available.
First however the advanced British squad on the bridge turned their guns on the Junior Leader who had unwisely decided to stand and spray them with his MG instead of seeking sanctuary. This, along with capturing the JOP with the turn end, sent German morale plummeting to two (though mine was at a fairly fragile five). 


This also meant Martin lost another JOP - the one nearest the bridge meaning his last squad had to deploy on the far right of his line.


Now we were at difficult decision time. I needed to try and drive Martins morale to zero, but with no easy to take JOPs and three full strength German squads in attendance I couldn't see how.
In the meantime German fire had driven one of my sections from the field and reduced the other in the ditches to just four men.


My (frankly rather desperate) plan was to advance the squad on the bridge, deploy smoke to cover the left flank and reduce German fire and then try and "snipe" with Brens to kill the MG team (and hope for a JL) to try and break the Germans. Like I say, desperate. I also decided that any further casualties would mean I should withdraw.


And so the squad on the bridge advanced tactically to draw a bead on the Germans in the ditch.


Smoke protected the last squad (though they could draw line of sight to the German MG team)


At this point Martin, seeing the threat on his flank and feeling the pressure mount decided to go on the offensive. Hurling hand grenades the Germans rushed the men on the bridge.


Sadly for Martin on a single hand grenade found it's mark.
The defending British were wiped out in the resultant combat - however they did enough damage to wipe out the MG team *and* kill the Junior Leader.
Both of us would now need to toll twice on the bad things chart!


British morale tumbled to just three.
The loss of the MMG team had no effect on the Germans!
However with a high roll for the effects of losing his JL the German morale finally collapsed!


The narrowest of narrow victories to the British. Almost any other result in the combat would have seen me withdraw. It felt a bit odd that the Germans had two undamaged squads across the bridge facing a mere four British rifles and a smoke mortar but we reasoned they felt cut off by the recapture of the end of the bridge and worried by the British threat.

I am however a bit concerned by the butcher's bill and concerned it will come back to bite me later in the campaign - no such worries for the Germans who just get an endless supply of brand new troops for each game!

Really great to finally get the campaign underway. Really tense game too - I think the early turn end could have transformed things and when my charge across the open ground came up short I was convinced I was in for an ignominious defeat.
Great game with good company - well worth the eighteen month or so wait!

Now on to try and hold the line at Risqouns Tout!