Wednesday 30 September 2020

28mm Vegetable patches

As Martin correctly observed when we last played it's the detritus and little gardens that help to really set of a wargames table. I had a bunch of pre cut small MDF rectangles that were packaging for something or another that I'd squirreled away. So with some sand, some flock and some paper flowers I set to.


Vey simple. Sand and PVA to give a texture. Paint brown, then drybrush with oranges and off whites (I used decorators emulsion tester pots).
Then add some flocks, coarse turf and the like. The cabbages are craft shop paper roses - used for decorating greeting cards I believe. Paint them green and hey presto "cabbages" (probably slightly over sized but what the heck. Not my idea, stolen from Steve Jones (and subsequently used by many others).
Although intended for my Chain of Command games they're pretty generic and will do for anything from the Dark Ages to the present day.

Tuesday 29 September 2020

Making 28mm Hedges

My ongoing attempts to make more scenery for my Chain of Command WW2 games led me to hedges.

Many moons ago I bought a big bag of steel wool - so that would form the basis of my efforts.

I also made use of more of the craft sticks/tongue depressors.


This is what you're aiming for:


First cut off some steel wool, then roll it into a ball. A rugby league ball shape - very important to make sure it's not union ball shaped - that would be rubbish.


Then use some hot glue


To stick it to the end of the stick.


Add more balls until the stick is full. Then make some more sticks.


Spray the whole lot black.


Then spray with green - you could also use brown. (not sure how necessary this step is, really)


Then spray with spray adhesive. This stuff seems monster sticky "industrial strength".


Then tip flock over it and leave to dry.


I made five foot of hedges in about half an hour (plus some drying time)


It makes pretty fields.


And is just the right height for plucky Tommies to pop beastly Jerry from behind.


Tuesday 22 September 2020

Chain of Command 1940 - more Blitzkrieg against British

Martin came over again, this time with James as well for another game. We were considering Midgard but circumstances dictated differently and so we decided on a game of Chain of Command.

A game from the 1940 book this time. Jerry's objective is to capture the British JOPs or reduce morale to zero - the British need to reduce Jerry to 0.

We set up a network of fields with a road running across from the German deployment zone to the opposite edge.


I pushed up quite fast, hoping to catch the Germans close to their table edge as I knew I'd be able to pull my JOPs right back toward my edge.
I managed to catch two of Martin's patrol markers together and only just out of his deployment zone which pinned the Germans well back.
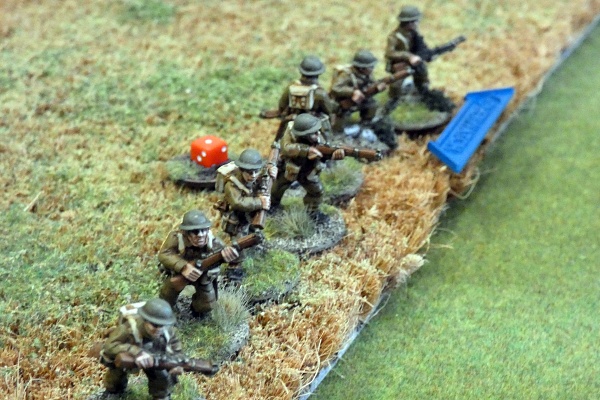
One of my JOPs went in a walled field about midway along my half of the table, with another right back on my table edge.


I pushed the third JOP forward, intending to use it to try and blunt the German spear.


And duly deployed a squad against the fence and with Bren in the field.


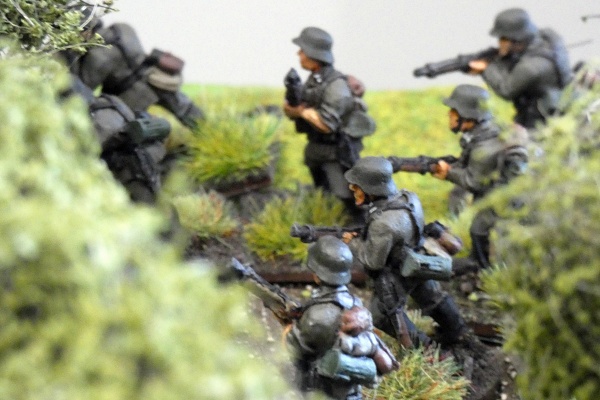
The Germans began to come on.


With a senior leader joining the group on their left. This would likely be their main attack I felt.


One of the scenario rules was that none of my support would appear until the second turn. So I was hoping for lots of fives to give me a CoC dice. 
Even better than that was the roll of three sixes I rolled second phase!


James kept pushing forward with the senior leader. Fortunately the recently ploughed field stuck mud to their boot and slowed them down.


Another German squad was pushing up in the centre.


My squad near the forward JOP attracted the attention of a German infantry gun! Wounding the Junior Leader. They pulled back out of line of sight into the field. But the position was looking shaky.


Germans were pushing up in force.


The FO and a squad of infantry appeared in the walled field.


And the FO called in a ranging shot.


 But still the Germans raced forward.


In the field the infantry waited.


The mortar rained fire down on the advancing infantry. Causing few casualties but stalling the advance.


More Germans were now by the orchard and in range of the walled field.


The British began to take fire.


I used a Chain of Command dice to pull back the forward JOP - just in time as the Germans headed towards the fence.


With the other squad also opening up the British in the field began to take casualties and shock.


The Junior Leader was hit for a second time and killed outright.
The remains of the squad pulled back.


The turn ended but the FO again made contact.


And called in another mortar barrage - forcing the German left further back.


At this point time beat us and we called a halt.
The game was still quite finely balanced - the Germans well advanced but the British still quite strong in defence and neither side's morale too badly affected.

Martin and I definitely making plans for the Fighting Withdrawal campaign - really looking forward to seeing how it plays out.

Monday 21 September 2020

Making 28mm walls

 The Chain of Command game with martin revealed the paucity of my collection of terrain for WW2 gaming.

So I decided to rectify that. I have plans to order some and scratchbuild a few more houses, but what I really felt I lacked to start with is walls (and hedges and fences, but we'll come to those).

So I decided to start by fettling some simple rendered walls - these feel kind of generic Norther France to me so they'll do for a start, and they're quick and easy.


I used cork for these, as recommended by the excellent Matakishi's Tea House

First take your cork tile, a steel ruler and sharp knife.


I measured a 2cm strip (measure twice, cut once) and cut it off.


Then I cut the strip in half. The tiles are 12" square, so each strip can be cut to make two 6" walls. You could make three 4" or  four...well, you get the idea.


Basing. I starded by cutting a cork base but decided that, unless I was prepared to cut the edges to an angle (and I'm not) they'd be too obvious on the battlefield.
Fortunately I remembered I had some craft sticks (tongue depressors, or large popsicle sticks if you're of an Amercan persuasion).
Even more fortunately these ones are 6" long too. Ideal. 


I used my sharp knife to cut roughly 45 degree angles at the ends to make sure I can butt the walls together at corners.


Then I used SperGlue to stick the wall in place.


It didn't take me long to fettle up several feet. I got carried away and made a gate for one.
Then I found a piece of square MDF and added a wall and a gate to make a walled garden or orchard.

You'll also see I've been working on  house too.