Tuesday 30 July 2013

King Arthur

Last week I came home to find a package waiting for me. Although Mrs Tom's Toy Soldiers was suspicious. my conscience remained clear - I hadn't ordered anything.
In fact it turned out to be a gift. 
A copy, from the author himself, of Dan Mersey's new book King Arthur.


It was a thank-you from Dan for playing in the large games of Dux Bellorum at Salute earlier this year.
I've had a quick skim through and it looks lovely with plenty to interest me.
I should point out its not a wargaming rule per se it's the stories of the various Arthurs from mythology along with a little historical speculation.
I'm saving a proper read for when I'm away on holiday - though I fear I may have to fight my eight year old for it.
If you'd like to get your own copy it's available from Osprey and local bookshops. And probably from nasty online, tax dodging bookshops too - but you should try and avoid using them.
All in all a splendid gift from top chap Dan - who really didn't need to, playing the big game was reward enough in itself.
Why not go and read Dan's Blog?

Friday 26 July 2013

The Loss of the Bruschetta Column

Colonel Silvio Bruschetta hummed lightly to himself as his column snaked through the tall elephant grass, a light comic operetta song that reminded him of home and mama. Despite the heat and the relentless attention of the files he was enjoying the march through the lush landscape.
Suddenly and without warning the column ground to a halt.
"Wassa da matter" he demanded of Ravioli the banner bearer "Why we a stop"
He soon had his answer. Sergeant Limoncello, leader of the Bersaglieri, came running up.
"There's a tree a Colonel. A tree filled a with a skulls. The Askari, they say its a bad juju to go further"
"We go on Sergeant" roared the Colonel" Skull tree or no Skull a tree we go on!"

 The Italian Column approaches the Skull Tree

 Hidden in the elephant grass are signs of habitation

 Nervously the colonial troops press on

 Despite their fears the Askari lead the way

 A sudden commotion at the rear of the column as spear throwing natives burst from cover

 The raw recruits of the Stracciatella Regiment are suddenly assailed by musket fire

 As natives burst forth from all around Colonel Bruschetta begins to realise he has blundered into a trap

Fumbling with nervous fingers the young troops fresh from home struggle to load as the warriors bear down on them

 But too slow! The fierce tribesmen are upon them and casualties begin to mount

 Bafuko the tribal leader springs from the grasses to urge on his men (and fire his shiny new gun)

 As desperate bearers push the mules onward the jaws of the trap begin to close

 Frantic now Bruschetta urges his men to form a defensive cordon. But all too late as the Bersaglieri are caught in the open

 Briefly the Colonel himself is caught by the savages (which makes his eyes water), but cold Italian steel sees them off

Rallying his men around the flag Bruschetta begins to sing a sad mournful song of home.

 Undaunted by the racket Bafuko urges his men on

The final minutes now for the struggling column as whooping tribesmen descend on them

I was lucky enough to play a splendid game of Death in the Dark Continent with James last night. He provided all the lovely models, scenery and the rules. All I did was roll some dice and shout "Mama-mia!" as I led the ill fated column to its doom.
The scenario is an ambush one from the rule book but we agreed the odds were rather stacked in favour of the Azande.
The rules themselves seemed to work well, I liked the way morale slowly crumbled affecting all elements of the troops until they broke and fled the field. The difference between the warriors of the Azande and the more drilled European troops also seemed to work well (albeit based on my very limited knowledge of the period.
The only downside of the whole splendid evening was the fluttering awakening of interest in a new gaming period. I've been toying with the idea of some form of Colonial behaviour for a while and James, like some sort of lead crack pusher began to talk of having some "spare" Africans... 

Monday 22 July 2013

Warhammer Orcs v High Elves

Gruzzkup sniffed the air. It smelled clear and crisp but there was something else too, the scent of flesh. Perfumed flesh. Elf flesh.
The Warlord hefted his chopper and narrowed his eyes.
Around him stood his biggest and best boys. To the left the witless shapes of the Trollz drooled and pawed the ground whilst beyond them Da Red Arrurz twanged their bowstrings and the menacing figures of Iggzi’s Stoojiz waited in disciplined ranks over toward the swamp.
“OK ladz, we ain’t got time to mess around. We need to meet up wiv da uvverz and den burn dis place to da ground” he paused for the cheering to subside “So lets run over dere, duff ‘em up good and proppa and den da fun startz!”
With that he pointed his mighty chopper at the thin white figures on the horizon and led the lads to meet their destiny.

The second battle in our campaign saw Gruzzkup lead an Orc (mostly) force against a foot High Elf force led by a level 4 mage and with a solid core of Phoenix guard.

 'ere we go, 'ere we go, ere we...

 Steady, girls, don't shoot till you can smell their breath

 Drool, stumble, drool

Waaaagh!

Again not many pictures, sorry...

At first all seemed to be going well for the greenskins as they rapidly closed on the thin white line, although some shooting – especially the flaming variety – whittled the trolls down a fair bit.
Unfortunately some short charges meant the attack went in a bit piecemeal and the new Phoenix Guard character is clearly designed wit the sole purpose of exterminating trolls. As a result the attack was swiftly blunted and the Phoenix guard wreaked havoc amongst the rest of my force whilst Gruzzkup was off killing some Sea Guard on one flank.


So far the invasion is not quite going to plan…

Friday 19 July 2013

Warbases Dark Ages Watchtower Finished

I'm afraid I rather abandoned the step-by-step approach for this last one and just got the tower finished.

The walls were washed with Gryphonne sepia then drybrushed back with Deneb stone and then white.

It was at this point the difficulties presented by having both roof and balcony in place really became apparent - but if you're going to render the walls I can't see a way around it - smarter modelers than me can doubtless find a way.
The wooden bits were largely drybrushed with an assortment of grays and browns and then washed with Devlan mud.

Finally the thatch was further drybrushed with Graveyard Earth and Bleached Bone.


What every Saxon Shore needs

The colour balance is a little out of whack on a couple of the pictures making parts of it look more orange than in reality.

Overall I'm very pleased with it. Yes the balcony is a little out of scale (it needs to be to fit a 20mm base on it) and yes it's not actually that tall and I'm not sure of its historical accuracy.
But for my purposes its just about perfect, cheap, gives effective results, doesn't take up too much space on the battlefield and most importantly says "late Roman Watchtower" to me. Scenery is representative for me and this one does that to a tee.

 Border Guard Duty

Keep those eyes peeled for Saxons...

Now to burn it to the ground!

Thursday 18 July 2013

Warbases Dark Ages Watchtower (4)

And so I set to with brush and vim and vigour.
First step was to spray all over with Plastikote Chocolate Brown to seal it in and give a good base colour.


Following this I painted the walls with Deneb Stone and overbrushed the thatch with Khemri Brown


On the home stretch now...

Wednesday 17 July 2013

Warbases Dark Ages Watchtower (3)

The next stage was to apply some texture to the walls. MDF is great but a little featureless. So I 'rendered' the walls with a mixture of filler, play sand and PVA glue that I mixed to be runny enough to simply paint on.
It was quite fiddly to get it under the eaves of the roof and between the A frame but I couldn't work out how I could have assembled differently to make it any easier. It was also at this point I was glad I'd decided to glue the roof down - to make it removable you'd have to leave the walls featureless, which seemed like it would look bobbins.


Hopefully this has "rendered" you speechless

Rendering dry it was thatching time. So I dug out the last of the trusty black face flannel and set to work cutting strips and soaking them in dilute PVA before laying them in place.


Short back and sides?

Good progress so far - time to get some paint on - tune in next time kids...

Monday 15 July 2013

Warbases Dark Ages Watchtower (2)

Progress with the Warbases Watchtower.

Once I'd got enough of the struts in place to set the balcony on and after they'd dried good and hard - if it's not hard don't carry on that's my motto - I glued the balcony down.
That way I figured I'd be able to glue the other struts in place to better compensate for any slight unevenness.


As you can see, not all of them in place at this stage. But adding them from here was much quicker than the previous stage, which made me wonder if I shouldn't have started by somehow gluing the balcony on first.

Once this had set I then added the roof and upper door.all of which just slotted into position.


All in all it went together very smoothly with the parts being a good fit. For £7.50 I reckon its a bargain.

Next stage some roofing and rendering and painting and the like.

Sunday 14 July 2013

Warbases Dark Ages Watchtower (1)

I've been building quite a bit of Warbases stuff recently.
As I did this one I took lots of step-by-step pictures.

This is their Dark Age Watchtower that I picked up recently for a very reasonable £7.50. It's much smaller than the ones available from 4 Ground, but for the skirmish size gaming I mostly get up to it's perfect and as I like my scenery to have a small footprint fits the bill exactly.

So what do you get in the bag?
A big pile of lazer cut MDF. All smelling slightly burny. There are no instructions. I'm not sure they're necessary to be honest, if you can't work out how to put this together you probably shouldn't be handling sharp modelling knives. Or indeed any sort of knife apart from those bendy rubber ones.
That said there were a couple of points when it might have been handy to have things spelled out - do this first or this bit coming up will be trickier then you imagine - that kind of thing.

The contents. Mmmmm, smells good.

Anyway with reckless abandon I started gluing together. I used PVA woodglue as, well its made of wood so that just seemed natural. First up I glued the tower core together. there is a little square piece that gives you the correct base shape and ensures the walls are reasonably square. There is another of these presumably to allow you to have an inner floor (and maybe for extra rigidity). I didn't bother, rigidity is not a problem for me. And I have no intention of putting models inside.

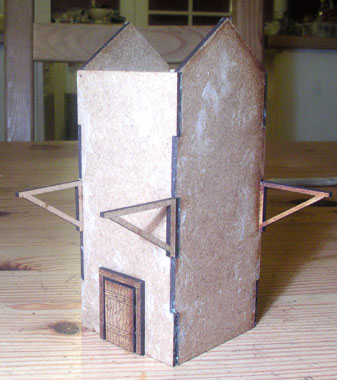
A column thrusts skywards

I suppose one should point out the importance of keeping the pointy edges opposite one another and the flat bits on the other sides, but see my comments about sharp knives earlier.
As you can see I used elastic bands to maintain my erection as it dried. 
What?

Next up I moved onto the roof. This is two flat bits that slot together and are then held in place by little A frames. The A frames have a wood pattern engraved on one side, so make sure that side is facing...oh you know this stuff. The A frames made this a bit easier to assemble the roof than I've found it on a couple of the Warbases models.

Tidy

Finally for sub assemblies I glued together the balcony. Four fences (two of one type two of another) glued into a big square bit with a central hole (also square). As with pointy and non pointy ends you need the same types of fence opposing one another but as you've worked out how to read and use the interwebs this shouldn't be beyond most of you.

A balcony. Or small child's playpen

Several days later I returned to the project. Sticking on the balcony before the roof seemed to me the way to go. Presumably if you're putting a floor in you may want to not glue the roof down but as that would be the choice of a loony I disregarded it. The balcony sits on some thin struts. One option I guess is to stick the struts to the balcony first and then attach the whole kaboodle to the tower. I decided to attach struts to tower then lower the balcony on.
I marked the height I wanted the balcony at and then set to work gluing. To be honest it was a bit of a faff and took a long time but i got there in the end. persistence and patience are not the middle name of anyone in my family, so some of you may find this bit less irksome than I did.


Like a small wooden pylon

This isn't all of them added, there are eight in total (two at each corner for the mathematically challenged among you) but it gives the general idea. Getting them level is pretty important as the balcony will sit atop them and be wonky if you've not got it right.

I also added the lower door at this stage. The upper door I decided would look better under one of the peaked tower ends, so for variety I placed the lower door at the base of one of the flat-topped sides.